 |
Summer Pastel
(As Tin, my friend, suggested.) |
Hey guys! Here's my nail-art tutorial number two (in photos)! :) Though it may seem like the summer season has already gone to pass, I think summer is still appropriate for this design because of the colors. Hehe.
I saw this particular post in Pinterest that got me interested and want to replicate.
 |
| Photo credits to whoever owns this photo. |
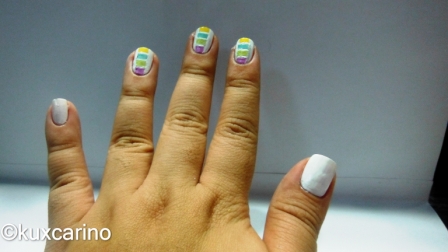
Though my nails aren't close to this perfection but, yeah, i think they're still passable.
I only did three fingers because I got too tired of taping the two fingers so I just went on and improvised. Nyahaha.
So, on to the tutorial, i guess.
Beware!
This nail art design shall require the doer a LOT of patience. I only had it up to some extent. LOL.
What you'll need:
1. Nail Polish of your desired colors.
- Orly Bonder - to protect your nails from being brittle and yellowing. Also helps the nail polish stick.
- Orly Clear Nail Polish - to finish off your design
- Cutex White - Base Color
- BK Nail Polish - in pastel green, purple, aqua, and yellow
2. Masking Tape
3. Thin Nail Art Tape
4. Flat Nail Art Brush
Steps:
1. Paint your nails with one coat of Orly Bonder.
2. Allow bonder to dry and paint your base color to all the nails.
3. Apply two coats to make base coat look more opaque. Allow to dry
COMPLETELY. The reason for this is that you will be putting sticky tapes on top of your base coat. If the polish hasn't dried completely, there is a risk that the nail polish shall come off with the tape when you remove it.
4. After hours of waiting, prepare your masking tape.
5. Cut it into strips that is enough to cover the rest of your finger nails while leaving the middle part visible for painting. If you want, you can use a pen and mark the tip of your nails to guide you as to where to put the masking tape.
6. After doing so, your nails should look like the image above. To make things easier, you can cut the excess masking tape above your finger nails.
7. Now we go on to putting the thinner tape to mark the boundaries of the box design that we intend to do.
This is how your nails shall look like after you are finished putting the tapes.
8. Now it's time for the colorful part. Paint your nails according to whatever color arrangement you like. Make sure each color does not cross the thin lines that demarcate each "box" that needs to be filled. For each color, use two coats for each finger. See following photos:
9. After everything has been done. Allow the polish to dry. Slowly pull out all the tape starting with the smaller ones. After removing everything, your nails should look like this:
Do not worry if they seem to be very untidy. Once you put top coat on them, the edges will soften and they'll look purrfect! :)
10. So, for the two remaining nails, which I have mentioned were improvised. I was too lazy to do the taping again. Moving on, here's what you'll need:
The same nail polish color combination. And a dotting tool.
11. Put a small amount of nail polish (of your preferred color) on a piece of paper. Using the dotting tool (biggest dot), dab five circles beside each other (resembling a flower). You can slightly tug on the dotter if you want the petals to be elongated rather than circular. Repeat process until your nail is pretty much covered. Use various sizes for the flowers for a more aesthetic effect.
Using a different color, put a dot at the middle of each flower, and viola!
12. Let everything dry until you put on top coat to avoid smudging.
And there you have it folks, your Summer Pastel Nails. :) (Thanks again Tin for the design name).
Click Here for Nail Art Tutorial: Geometric Nails


No comments:
Post a Comment